How to Clean Up and Organize Crowded Navigation Menu’s
 As PTAs and PTOs start to add more and more content to their websites, many will start to notice that their top navigation menu might not look right anymore because there are too many links on it and it is now moving to a second line. This is especially common after switching themes. The image to the right is a great example of the kind of cluttered navigation that is common to new PTA and PTO websites.
This tutorial will show you how to assign the correct menu to your theme as well as how to modify and adjust your menu. Most of our themes also support Drop Down Menu’s, so we will also show you how to make sub-menu’s to help consolidate. Please note that this tutorial is based on our Starter Theme, but applies to any Digital PTO theme that has the option to assign a menu to the navigation. We do offer a select group of themes that do not support menu’s. If this applies to you, we would suggest selecting a different theme, or making fewer pages.
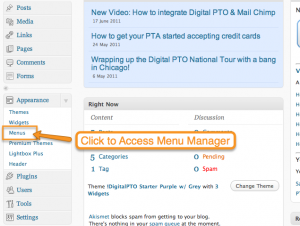
Step 1: Click on MENUS in the Appearance Menu
Click on the MENUS link in the Appearance Menu to access the Menu Manager.
Step 3: Assign a Menu for your Theme (probably Main Nav)
 If you do not have a menu selected in the “Theme Locations” box, please select the Main Nav Menu from the list and click SAVE. If you have created a different menu, you can select that instead if you would prefer.
Step 4: Review your current Navigation
 The current Navigation (Menu layout) is presented on the right of the screen. Each Grey box represents a menu item in your navigation. You will see some default pages added to the menu, but you may have more you want to add. Those will be loaded from the left side under the PAGES Option Menu.
Step 5: Add Pages you wish to include in Menu
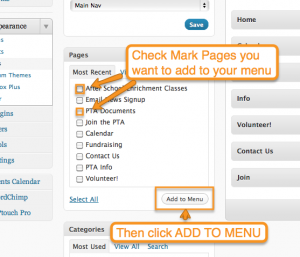 Once you have reviewed the pages you currently have in your Menu, you can add additional pages you have created. To add additional pages, look for the page or pages you want to add in the PAGES list. Check the box next to the pages you want to add to your Menu and then click the ADD TO MENU button. If the page you are looking for is not listed, try clicking on the VIEW ALL or SEARCH tab. This is common for sites with hundreds of pages.
Step 6: Moving Pages around in Menus & Creating Sub Menus
 Your new pages were added to the bottom of your menu. More than likely, you are going to want to move them around. it is very simple to move a page around in your menu. Click on the menu (and hold down) and drag the page around on the menu. This is also how you can create Sub-Pages (drop down pages). If you move a page slightly to the right, it will become indented. This is the indication that the page has become a sub-page. Feel free to move your pages around as you would like.
Step 6: Editing & Shrinking Page Menu Names
 Some of your Pages might have rather long titles (like: After School Enrichment Classes), which is just fine, but they might be a tad long for your menus. We highly suggest keeping your menus as short as sweet as possible. In the example above, we can change that menu item to “Enrichment” and still keep the main page’s title the same. Do do this you need to click the triangle to the right side of the menu item you want to edit. This will open up the options. Enter the new Menu Title under NAVIGATION LABEL. Click the arrow again to shrink the options back up. Continue to repeat those steps for any menu items you wish to change.
Step 7: How to Delete a Menu Item
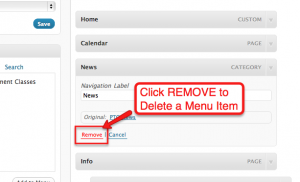 If you want to remove or delete an item from your menu entirely (don’t worry, it won’t delete the page, just the menu item), you can do so by clicking the arrow to the right of the menu item you wish to remove. Once that opens, click the REMOVE link.
Step 8: Finish any changes and SAVE MENU
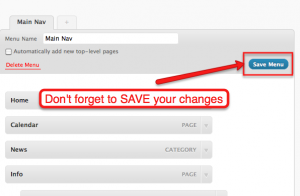 After you have made all the changes you wish to see on your menus, be sure to click the blue SAVE MENU button to save your changes.
Step 9: Review your Menu on the Live Site
 Now that you have saved your Menu, it’s a good idea to check your live site and make sure that it’s working as you had hoped. It’s possible that you may need to make additional adjustments, but viewing your live site’s menu will help you determine if any additional steps are needed.



 Are you a Premium Plan member yet? It might be time to get started.



 Need More?
