How to use your Premium Plus Events Calendar
Digital PTO Premium Plus (Paypal or Credit Card) Members have access to our most feature rich calendar, the Premium Plus Events Calendar. This calendar is very powerful and allows you to display your events in a variety of ways including the ability to filter events by specific categories. Please note that this calendar must be the only calendar activated on your website. As a Premium Plus Member, you have access to any of our three different calendars, but you must ensure that only one is active at a time.
View a live demo of the Premium Plus Events Calendar Here
Attention Premium Plus Members: If you signed up for service BEFORE June 10th, 2013, you do not have the Premium Plus Events Calendar Installed. It is available to you, but not activated. You may follow the instructions below to active your calendar, or if you would prefer, send us an email ([email protected]) and we would be happy to install it for you. Please note that events from previously installed calendars do not automatically get added to the new calendar, so be sure to keep track of your old events as they will be deactivated when we install the new upgraded calendar.
Step 1: Verify that your Premium Plus Calendar is activated
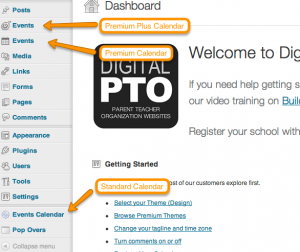 The Premium Plus Events Calendar is activated automatically for our Premium Plus Plan members. The graphic above shows all three different calendars installed at one time (you don’t want to do this..) so that you can see the differences. Please ensure that only the Events tab (with the check mark icon) is displaying. If other calendars are activated, please deactivate them using the methods below.
Step 2: Activate your Premium Plus Calendar
 If your Premium Plus calendar is not activated, please go to PLUGINS and then click the All In One Event Calendar by Timely activation link to activate your calendar.
Step 3: Deactivate other calendars if necessary

![]()
 As we mentioned before, you can only have one calendar active at a time or they will not function properly. If you have the Premium Calendar or the Standard Calendar activated, be sure to deactivate them by going to PLUGINS and then click the DEACTIVATE link under the following plugins: Events Calendar PRO, The Events Calendar and WP Events Calendar
Step 4: Adjust your Settings as needed
 If we installed your calendar for you, your settings should be just fine as they are, but if you need to make adjustments, go to EVENTS > SETTINGS and you can adjust them there. There are three major settings you’ll want to look at on this page. First check to see that your “Calendar Page” is set to Calendar. This will add the calendar to the page that has already been set up for it. Second, if you want your display to look like a traditional USA calendar, change the “Week Starts On” setting to Sunday. Third, under “Available Views” change the default setting to the MONTH view (it starts on Posterboard). This is get your calendar set up in the most traditional way.
Step 5: Set Up your Categories
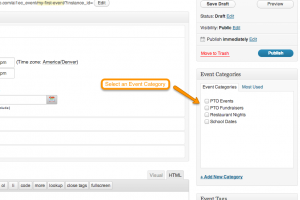
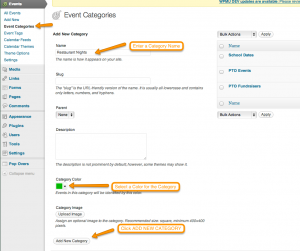 One of the most amazing elements to the Premium Plus Calendar is the ability to assign different categories to your calendar. Assigning events to categories will allow your users to filter their calendar view to their specific needs and will also help color code your calendar to make it easier to read. Common categories are: Fundraisers, Events, School Days, Holidays, Restaurant Nights, Class Parties, Deadlines, etc. We HIGHLY suggest that you use the categories as this is a great feature of this advanced calendar.
To set up your categories, go to EVENTS > EVENT CATEGORIES. Enter a Category Name and a Category Color. You can select Parent Categories, add descriptions and images as well if you’d prefer, but these are not necessary. Then click ADD NEW CATEGORY. Repeat for all of your categories. You can always add more later, but it’s best to get at least a few started.
Step 6: Adding an Event (Basics)
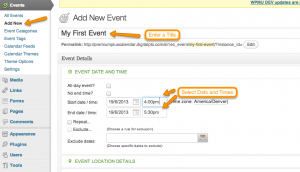 Once you have established some categories to get you started, go to EVENTS > ADD NEW to add your first calendar event. Enter a TITLE, Enter the DATE and TIME (or select ALL DAY).
Step 7: Adding an Event (Location & Other Details)
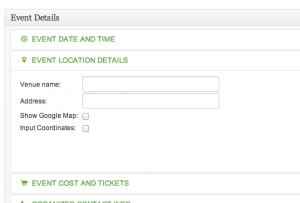 After you have entered the name and dates and times, click on the green header that says EVENT LOCATION DETAILS. If you would like to add the location and address of the event, this will display a nice Google map on your event details page for your users. Be sure to click the box to display a Google Map if you want that to show. This is optional. Clicking on the additional green headlines (Event Cost and Tickets, Organizer Contact Info) will give you additional fields you can specify if you wish. These are also optional.
Step 8: Adding Additional Details about your Event
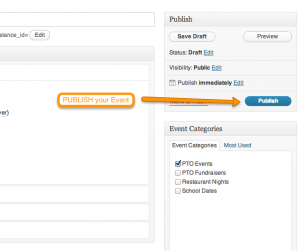
 Below the event details boxes, you will see a familiar text input box that allows you to add as much detail about your upcoming event as you wish. This works the exact same way that the News Posts and Info Pages work. Feel free to add as much or as little information as you want in this box.




 Need More Help?
