Setting up the Quick Flickr Widget Plugin
The Quick Flickr Widget Plugin installs a widget for your sidebar that will display photos from your school’s Flickr.com account. If you do not have an account, you can set one up at Flickr.com. Once you have installed the plugin, go to your widgets and look for the Quick Flickr Widget to place and edit it.
Step 1: Place the Widget
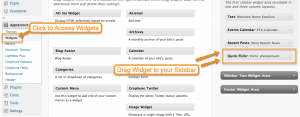
Access the Widgets by clicking on WIDGETS in the APPEARANCE Menu. If the Quick Flickr Widget is not already in your sidebar, go ahead and drag the Widget over to the sidebar by clicking on it, dragging it and releasing the mouse button.
Step 2: Add your Flickr Screen Name & Info
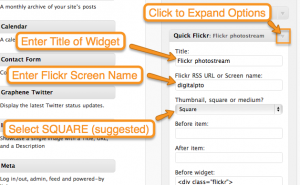
Click the Triangle in the Menu bar to open the options. Enter the TITLE. This is what your visitors will see above the photos. Keep it short. On the next line, enter your Flickr.com username. Your username is in the url of your flickr account. Look for http://www.flickr.com/photos/USERNAME. In the size option drop down, we suggest selecting Square to make everything look nice.
Step 3: Select Number, Thickbox and Save
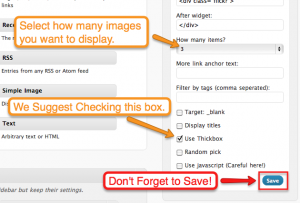
Select how many images you want to show in your sidebar. Start with 4 or 6 and preview the changes to see what looks best on your theme. We also suggest checking the option to use Thickbox. This will allow the image to be enlarged in another layer and not take the visitor away from the page they are viewing. All other fields can be ignored or left as is. When you are finished, be sure to click on SAVE to save your changes.


 Need More Help?


