How to add Credit Card Processing to your Wufoo Forms
If you are a Premium Plus Member, you have the ability to accept credit cards on your Digital PTO website. There are a few requirements for setting up your credit card processing.
- You need to have a wufoo account set up by Digital PTO. If you have not completed the request to add a payment form to your website, please be sure to submit your request here.
- You will need to apply for a merchant account with our partner, Capital Merchant Solutions and get access to your Authorize.net account. If you need to apply with CMS, please click here.
- You will need to activate your Authorize.net account by logging in for the first time and completing the final steps.
Once you have completed the steps above you are ready to get started!
Step 1: Log into Authorize.net and click on ACCOUNT tab
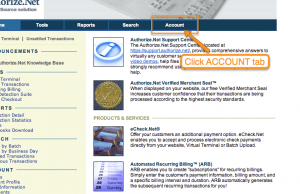 Once you have logged into Authorize.net, click on the ACCOUNT tab up top to access your API information. This will be required to tie the account in with your wufoo forms.
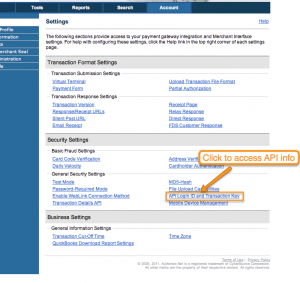
Step 2: Click on API LOGIN ID & TRANSACTION KEY
 Click on the title of the FAMILY REGISTRATION form. When you hover over the title, you can also click EDIT if you prefer. This will open up the form editor.
Step 3: Follow Instructions to Create a New Transaction Key and API Log in
This screen contains too much private information to post a screen shot of, but when you click on the API link to access this screen, you want to create a new Transaction Key. Once you have the API Login ID and the Transaction Key, COPY them and SAVE THEM. You will not be able to see them again, so be sure to save them in a safe spot. This is EXTREMELY IMPORTANT.
If you do lose your API info, you can generate a new Key, BUT the old key will be deleted and thus BREAK YOUR FORMS, so we can not stress enough how important it is to record this API info and keep it in a safe spot. In the event that you need to create a new API key, be sure to update ALL of your wufoo forms that contain the old transaction key or they will not work.
Once you have recorded your API info, you can log out of Authorize.net.
Step 4: Log into your Wufoo Account
 Login to your Wufoo Account. You can log in at https://wufoo.com/login/
Step 5: Click on the PAYMENT link under the Form you want to add payments to
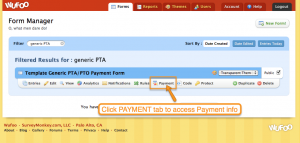 Find the form you wish to add payment capabilities to in the list of Wufoo forms and click the PAYMENT link under the main form title.
Step 6: Paste your Authorize.net API info under Step One
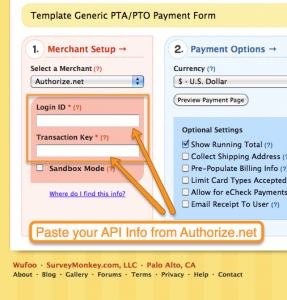 Select Authorize.net from the drop down of payment providers and then paste the Login ID and the API Transaction Key in the available fields.
Step 7: Uncheck ENABLE PAYMENT Option and SAVE SETTINGS
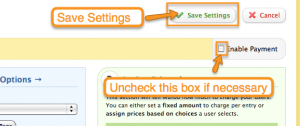 If you have not yet assigned prices to your Wufoo form (which you probably haven’t) you will not be able to save your API info unless the ENABLE PAYMENT checkbox is not checked. For the time being, make sure that check box is unchecked and then click SAVE SETTINGS.
If you do already have prices enabled and set, you do not need to uncheck the ENABLE PAYMENT box. This simply allows you to save the API info without having to complete all the other steps.
Congrats! At this point, your API info is saved and you are ready to assign prices to your form.


